10 Questions Before Choosing Thinning Scissors
Read the teeth, hand and exact option together.
By JapanShears EditorialUpdated
On this page
Name the job your cutter cannot do alone
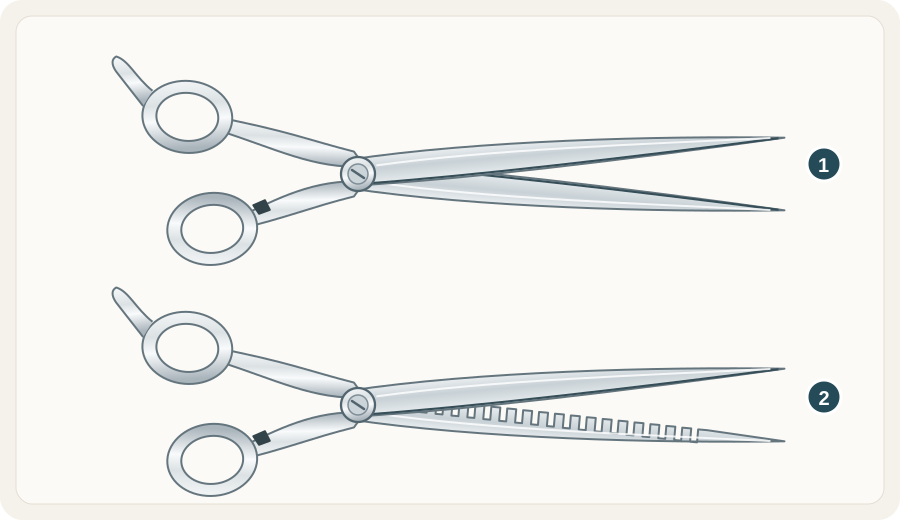
A cutting shear establishes the shape with two continuous cutting blades. A thinning or texturising shear has a toothed blade that changes which hair meets the cutting edge. Before adding one to your kit, name the task: blending a transition, changing weight within a section or placing a more visible texture pattern.
Those jobs can call for different tooth layouts. “Thinner” and “texturiser” are useful product descriptions, but the precise design matters more than a label on its own.
 Open illustration at full size
- Cutting shearTwo continuous edges for cutting a line or section.
- Thinning shearA toothed blade paired with a cutting blade. Compare the exact tooth design as well as the count.
To read the smaller details in a product photograph, use the thinner anatomy guide. It separates the tooth body, gap and tip from the opposing cutting blade, so you can describe the feature you are comparing.
Ten questions to narrow the choice
Answer these before choosing a tooth count. The questions define your buying brief; the ten-model shortlist then helps you compare real tools.
| Question | What to establish |
|---|---|
| 1. What job is missing? | Name the blend, weight change or texture effect your continuous-edge cutter cannot provide alone. |
| 2. Where is the change needed? | Identify the area and the shape you intend to keep; a thinner does not need to be used throughout a haircut. |
| 3. What are the texture and density? | Observe individual strand thickness and the amount of hair separately. Fine strands do not automatically need thinning. |
| 4. Which cutting hand do you need? | Begin with a confirmed left- or right-handed build before comparing the other fields. |
| 5. What length is familiar? | Compare the thinner’s own nominal length with a tool you control; a set’s cutter size may differ. |
| 6. What is the exact tooth count? | Keep the selected number with the full model or option code. It identifies the tool rather than ranking its effect. |
| 7. How are the teeth shaped and spaced? | Compare the bodies, gaps, tips and grooves. Use the anatomy guide to name what you see. |
| 8. What does the maker’s cut ratio describe? | Keep any stated percentage attached to that exact model. Do not infer a ratio from count or promise the same removal from every section. |
| 9. Do you need a pair or a standalone thinner? | If your cutter already covers its job, compare an individual thinner before replacing both tools. |
| 10. How will you assess a new design? | For training, agree a supervised comparison with your educator and record the named tool, placement and observation. |
For unfamiliar terms, the plain-English scissor glossary explains the difference between tooth count, cut ratio and the tool’s cutting hand.
Tooth count is a field, not a removal rule
Count tells you how many teeth the selected option has. Look at the tooth width, gaps, tip shape and any grooves as well. The way you section and place the shear, and the number of closures, also affect the result.
There is no dependable rule that more teeth always remove less hair. Yasaka publishes a higher cut-rate range for its YS-400 than for its YS-300, despite the higher tooth count. Both maker pages describe prism-cut tips and V-grooves. The full design is the comparison.
If a maker publishes a removal percentage, treat it as that model’s specification. It is not a promise that one closure will remove that percentage from every section you work on. Do not transfer it to another 30-tooth shear simply because the count matches.
The cut-ratio guide shows how to read an attributed figure. For actual construction choices, the ten-layout model map keeps the teeth beside the handle, blade and nominal size.
Read the Yasaka YS as four options
The local Yasaka YS listing offers a right-handed, nominal 6.0-inch thinner in four tooth counts. Choosing YS does not finish the choice:
| Tooth option | Exact option |
|---|---|
| 16 teeth | YAS-YS-16T |
| 20 teeth | YAS-YS-20T |
| 30 teeth | YAS-YS-30T |
| 40 teeth | YAS-YS-40T |
This family lets you hold the listed hand, nominal size and offset handle steady while comparing the teeth. Read the chosen option’s specification rather than using the lowest or highest number as an automatic recommendation. The Yasaka profile places YS alongside the maker’s cutting models.
Yasaka’s separate YS-30S, 30T and 30W listing asks a different question: how do three 30-tooth designs differ? Keep those suffixes intact. They are not three more tooth-count options in the YS selector above. The same-count comparison puts their model details side by side.
The Joewell HXG supplies a separate 17- or 20-tooth comparison. Joewell’s specification list identifies HXG-17 and HXG-20 at a nominal 5.9 inches. Neither is a 30-tooth option. Use the Joewell profile to distinguish HXG from its cutters and other toothed models.
Keep handedness as a firm requirement
If you cut left-handed, begin with a dedicated left-handed thinner. Moving a right-handed shear to the other hand does not change its blade orientation.
The Ichiro Rose Lefty thinner is a useful exact example: a nominal 6.0-inch tool with 30 V-shaped teeth, a left-handed offset build and the single SKU ICH-ROSE-LT60. There is no tooth-count selector on that listing. Its 30 teeth do not make it interchangeable with the right-handed YS 30-tooth option.
For the broader choice, use the left-handed guide and left-handed collection. A suitable left-handed cutter is still a cutter; it cannot substitute for a thinner when your brief calls for teeth.
Compare a set as two tools
If you need a cutter and a thinner, read each component. In the Mina Sakura II set, the selected cutter can be 5.0, 5.5, 6.0, 6.5 or 7.0 inches. The listed thinner stays at 6.0 inches with 30 teeth. Choosing the longer cutter does not lengthen that thinner.
The sets collection is useful when both tools answer your brief. If your cutter is already suitable, compare individual thinners instead of replacing it just to buy a matched pair.
Leave room to assess the result
Start with a clear reason for each placement. Follow the sequence your educator or the exact maker has demonstrated for that tooth design, including when to comb out and inspect the section. Repeated closures at the same point can accumulate a change that was hard to see after the first closure; agree how you will assess that change before continuing.
If you are learning a new toothed tool, take a supervised comparison brief to your educator. Agree the placement and sequence together, then record what you observed from the named tool. That is more useful than deciding on a tooth count before seeing what the design does in your planned work.
Clear trapped hair from the teeth and follow the maintenance guide if the action changes. For a shortlist, use the buyer guide and Shear Finder; for the wider catalogue, browse thinning shears. If you need a particular hand, length and tooth layout that you cannot find, send those requirements to us rather than compromising the hand or tool type.