JapanShears Editorial · Published
10 Signs Your Shears Need Attention
Ten changes in how a shear sounds, feels and cuts that mean it needs a closer look, and what to do first without making the problem worse.
On this page
- How this list was chosen
- 1. Hair folds or is pushed along the blade
- 2. The action changed after a drop or knock
- 3. The blades grind, scrape or feel rough
- 4. The blades feel loose or wobble
- 5. The shear is stiff or sticky
- 6. A visible nick, chip or bend
- 7. The cut leaves strands or an uneven line
- 8. A thinner’s teeth are clogged, bent or damaged
- 9. A small part is missing or worn
- 10. Spotting, discolouration or residue near the pivot
- What to do first
- What not to do
- Questions people ask
- Further reading
A shear that needs attention rarely fails all at once. It starts to sound, feel or cut a little differently, and the sooner you notice and describe the change, the easier it is to put right. These ten signs are prompts to look closely, not diagnoses.
Short answer. Stop using the shear on clients as soon as it folds or pushes hair, catches, grinds or has been dropped. Clear it, dry it and look at it in good light. Then record where on the blade the change happens and contact the maker or a technician who services that design, rather than adjusting it repeatedly.
How this list was chosen
These signs reflect general trade knowledge of how shears behave when something has changed, and the way symptoms are usually reported to a service technician. We have not tested or measured any tool, and a sign here does not establish its cause. Reviewed 4 November 2026. Several different problems can show the same symptom, which is why the next steps matter more than the guess.
1. Hair folds or is pushed along the blade
If hair bends and escapes instead of being cut cleanly, the blades are no longer meeting the way they should. Trapped hair, tension, edge wear and technique can all play a part. Clean and dry the shear first, then note where the problem occurs. The article on shears that push, fold or catch hair separates the ordinary causes.
2. The action changed after a drop or knock
A fall can affect the edge or the alignment, and tightening the screw may not help. Stop using the shear on clients, protect the tips and look for visible damage. Do not keep testing it by cutting; describe what happened and when to the technician.
3. The blades grind, scrape or feel rough
A smooth shear closes with an even feel. A grinding sound or a rough patch suggests something between or on the blade surfaces: residue, a damaged part or a worn area. Stop at the point where it catches rather than forcing the blades through it.
4. The blades feel loose or wobble
Excess play at the pivot, or a screw that keeps working loose, means the assembly needs checking against the model’s instructions. Adjustment systems differ: some use a click-lock, some a screw and some a bearing. Follow the instructions for the exact model, and do not guess.
5. The shear is stiff or sticky
If a shear that used to open freely now drags, residue or moisture near the pivot may be involved. Clean and dry it following your workplace procedure and the care instructions supplied with it, then check again. If stiffness remains, the cause may not be on the surface.
6. A visible nick, chip or bend
Look at the cutting edges and tips in good light, holding the shear by its handles. A nick that you can see, or a tip that has bent, will usually show up in the cut. Do not run a finger along an edge. Photograph it and keep the tool out of use.
7. The cut leaves strands or an uneven line
Notice where on the blade it happens. A problem that is limited to the heel is a different report from one at the tips, and from one along the whole edge. The diagram below shows the landmarks you can use to describe it.
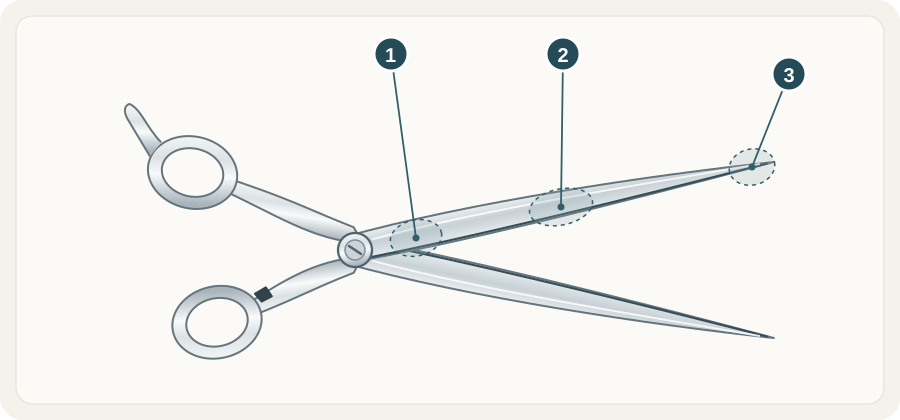 Open illustration at full size
- HeelThe part of the cutting blade nearest the pivot.
- MiddleThe central span of the cutting blade.
- TipThe end of the blade. Note catching or folding here separately from the rest of the cut.
8. A thinner’s teeth are clogged, bent or damaged
A toothed shear needs its tooth line checked as well as its pivot. Hair trapped between teeth, or a visibly bent tooth, will change the way it closes. Clear lodged hair gently and avoid forcing another tool between the teeth. If a tooth looks damaged, stop using the thinner.
9. A small part is missing or worn
A bumper, finger rest, ring insert or screw that is missing, loose or visibly worn is a service matter, not a reason to sharpen. Replacement parts depend on the model, so give the technician the model name and SKU along with the part you have noticed.
10. Spotting, discolouration or residue near the pivot
Marks around the pivot or on the blade faces can mean moisture or product has been left on the tool. Wipe and dry the shear thoroughly, and store it in a dry case. If marks return or spread, take a photograph and ask the maker or a technician about it rather than scrubbing the blade.
What to do first
- Stop using the shear on clients once the action has changed.
- Clear and dry it following the care instructions for the model.
- Look in good light and note where the symptom occurs.
- Photograph the shear from several views, including any markings.
- Ask the maker or a technician familiar with that edge, and send the model, the symptom and any history, such as a drop.
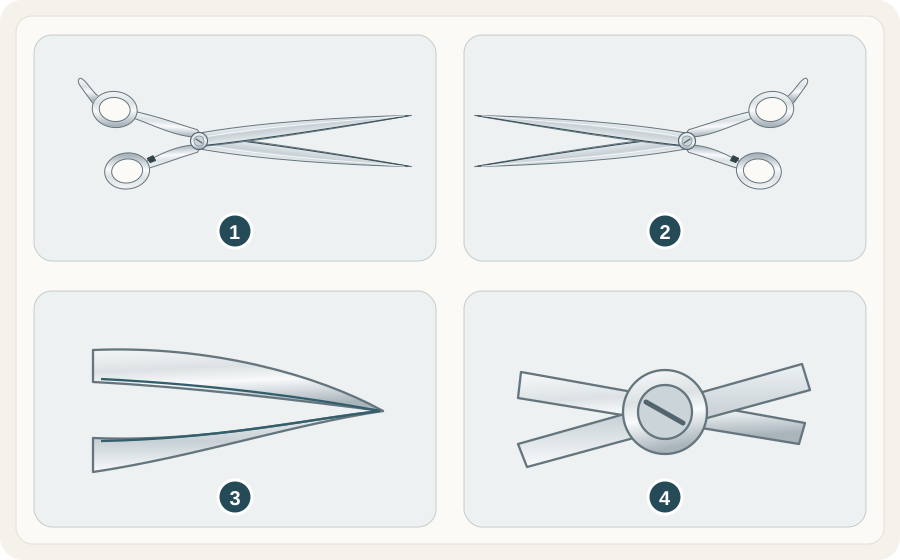 Open illustration at full size
- One complete sideInclude the whole tool, rings, rest, blades and any visible model marks.
- The other sideTurn the whole tool over gently and photograph its other face.
- Tip detailUse good light to show the tips and any visible concern without touching the edges.
- Pivot detailShow the intact hardware. Do not dismantle the joint to take a photo.
Our guide to ten questions before sharpening shows what a technician will want to know, and the Warranty page explains how issues with a JapanShears order are handled. The sharpening advice page explains how to start a service enquiry for a Japanese shear.
What not to do
Do not keep tightening the tension in search of a cure, and do not try to sharpen a convex or toothed edge yourself. Both can turn a small, describable problem into a larger one. Keep a maintenance log so that the history is on paper when a technician asks for it.
Questions people ask
How often should shears be sharpened? There is no universal interval. It depends on the model, the work and the hair, so use the symptoms above and the maker’s guidance.
Can I tighten a loose pivot myself? Only by the method given for that exact model. If you do not have the instructions, ask the maker or a technician before you adjust.
Further reading
- The shear care guide for the routine that keeps most of these signs from appearing.
- Scissorpedia, an information website on scissors in general.
Scissorpedia is a fellow member of the ShearAlliance; see ShearAlliance. The knowledge base lists more care and service guides.
A closer look at shears
Comparing two models? Send us their names or SKUs and the cutting work you have in mind.
Latest blog posts
Read all blog posts
10 Japanese Shear Myths and What Is Actually True
Ten common beliefs about Japanese shears, from blade length to steel and origin, with a plain correction and a way to check each one.

10 Mistakes to Avoid When Buying Shears Online
Ten online-buying mistakes that cost stylists time and money, from trusting the family photo to skipping the returns terms, with a fix for each.