JapanShears Editorial · Published
10 Hair Scissor Buying Mistakes You Can Avoid
Avoid ten common shopping mix-ups about hair scissor size, handedness, blade construction, thinning teeth, sets and the price of the selected option.

On this page
- 1. Copying another stylist’s size
- 2. Treating overall length as blade length
- 3. Choosing a finish before the construction
- 4. Assuming every selector option is the same tool
- 5. Assuming both scissors in a set have the selected length
- 6. Letting a “lefty” label answer every hand question
- 7. Turning tooth count into a promised cut ratio
- 8. Buying an extra tool without a job for it
- 9. Comparing the starting price with the selected price
- 10. Reading support terms after using the scissors
Most scissor buying mix-ups start with a detail that looks obvious: the size in a photograph, the word “lefty”, or the price above a selector. Check that detail against the exact option before it becomes an expensive surprise.
These ten mistakes are useful checks for a first pair or a deliberate second tool. If you want the positive buying method from the start, use how to choose scissors.
1. Copying another stylist’s size
You see someone use a 6.5-inch cutter comfortably and assume the same size will suit your work. Their hand, handle layout, familiar tool and cutting task may all differ from yours.
Start with what you already control well and the job you need the scissors to do. If you are learning, bring your educator’s tool brief into the comparison. A longer option should have a clear purpose, such as more reach for comb work, rather than simply looking more professional. Our buyer’s guide gives hand, reach and construction their own checks.
2. Treating overall length as blade length
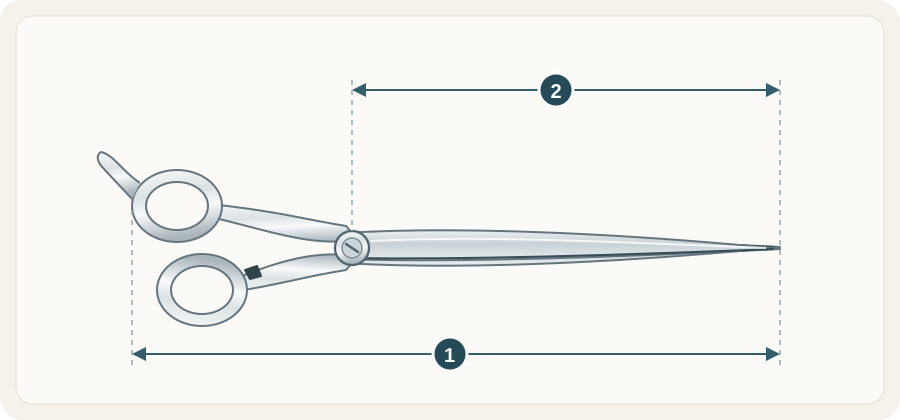
Two scissors marked 6 inches can have different pivot-to-tip spans and handle shapes. The nominal size does not give you six inches of cutting edge.
Compare the same measurement on both tools. Use the maker’s blade measurement where it is published, and otherwise keep the nominal size labelled as nominal. A photograph can help you see proportions, but perspective cannot establish a precise blade length.
 Open illustration at full size
 - Overall tool lengthCompare the maker’s stated whole-tool size. Finger-rest treatment can vary.
- Blade lengthA separate blade measurement. Check the model specification rather than converting its nominal inch label.
3. Choosing a finish before the construction
A black or rose-gold pair catches your eye, so you stop comparing the blade and handle. The finish tells you what the scissors look like; it does not tell you whether they have a convex edge, a micro-serrated blade or the thumb arrangement you wanted.
Choose the cutting hand, reach, edge and handle first. Then select the finish offered for that exact configuration. Our blade guide explains the construction choices that need more attention than colour. Check finish-specific care instructions too.
4. Assuming every selector option is the same tool
A product page offers several sizes, and you read one specification paragraph as applying identically to all of them. Some families change blade shape or construction across options; a set selector may also change only one component.
Read the details beside your selected model code. If a claim appears only at family level, ask whether it applies to the option in your basket. Keep the exact SKU with your notes. This is particularly useful when comparing a familiar size with a longer barber option from the same maker.
5. Assuming both scissors in a set have the selected length
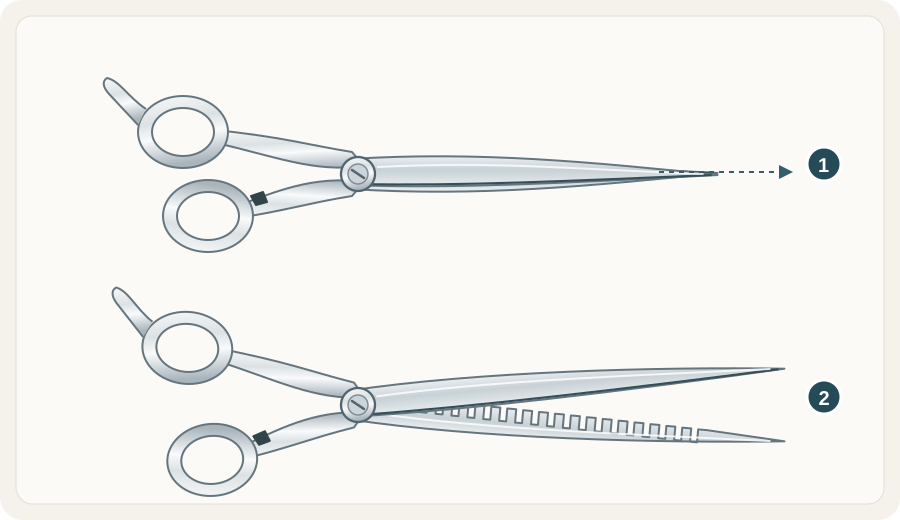
A 5.5-inch choice can refer to the cutter alone. In the Mina Sakura II 5.5-inch set, the cutter is 5.5 inches and the included 30-tooth thinner is a fixed 6.0 inches.
Write a separate line for each tool: type, hand, nominal length and relevant blade or tooth details. Compare those lines with the job you expect each tool to do. The cutting and thinning set article helps you compare actual pairs.
 Open illustration at full size
 - Cutter choiceA set’s size selector may change the cutter only.
- Included thinnerIts length and tooth count may stay the same across those choices.
6. Letting a “lefty” label answer every hand question
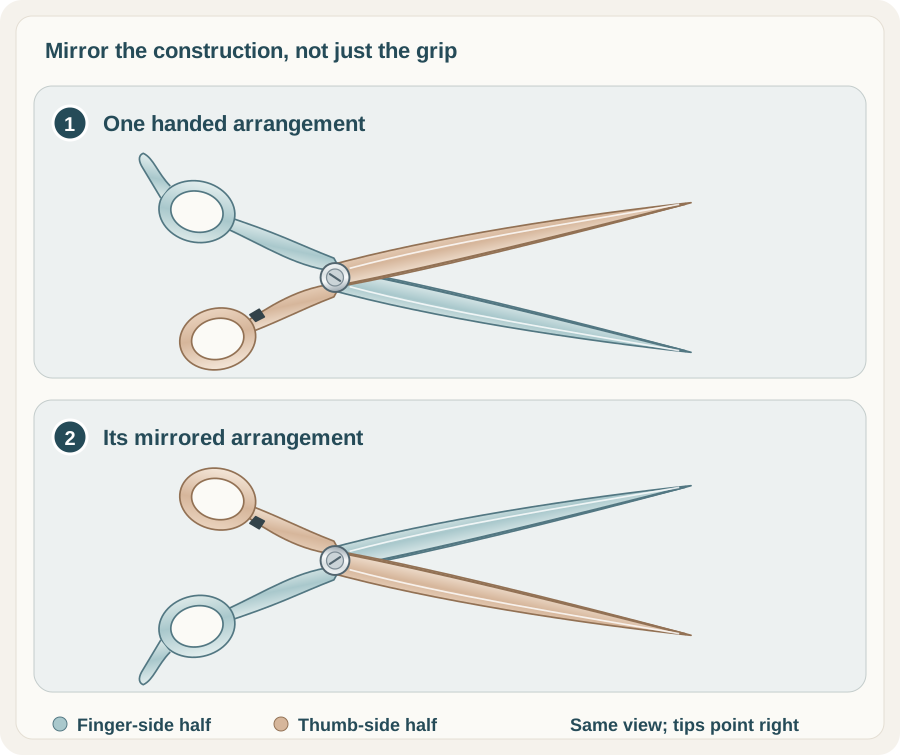
A listing mentions left-handed use, and you assume the blade arrangement has been reversed. Symmetric rings, a reversible finger rest and a true left-handed build describe different things.
Establish the cutting hand of the selected option and the blade and handle arrangement that supports that description. Ask the seller if the listing is unclear. Our left versus right-handed guide shows the mirrored construction; ring shape alone cannot settle the comparison.
 Open illustration at full size
 - One handed arrangementFollow each coloured half from its ring through the pivot to its blade.
- Its mirrorThe ring, shank and blade arrangement is mirrored together. Turning the first tool over in your grip does not rebuild it.
7. Turning tooth count into a promised cut ratio
You choose a 30-tooth thinner because you expect it to remove the same amount as another 30-tooth model. Tooth width, spacing, shape and the opposing blade also matter.
Compare the maker’s description of the intended effect and any published ratio for the exact model. Treat that ratio as the maker’s reference, rather than a promised percentage from every section of hair. The same-count comparison and cut-ratio guide explain why a count is only one field.
8. Buying an extra tool without a job for it
A set looks economical, but you cannot say when you would use its thinner or second cutter. That tool can add cost and care without adding a useful choice at the chair.
Name the missing job first. If your current cutter is behaving differently, assess its condition before treating another purchase as the answer. For a new tool, explain how it will differ in reach, blade or purpose from the one you already use. A single cutter may be the better starting purchase; a set becomes useful when both components have a role.
9. Comparing the starting price with the selected price
The search card says “from A$…”, and you compare that figure with another store’s exact option. After choosing a size or configuration, your basket may show a different amount.
Compare the actual option on both sides, including the delivery method and written contents. Do the same with a cutter versus a set: an extra tool is useful only if you need it. Our pricing guide keeps the purchase attached to the model and the full order.
10. Reading support terms after using the scissors
You try the tool, change its tension or discard the packaging, then discover that a change-of-mind return requires unused condition. A short return banner may also leave out when the window starts or who pays freight.
Read delivery, returns and warranty before paying, and ask about conflicting wording. Use the ten seller questions to check those terms. On arrival, follow the inspection checklist before cutting or adjusting. If the option or condition is wrong, a clear order record and photographs give the seller a useful starting point.
A closer look at shears
Comparing two models? Send us their names or SKUs and the cutting work you have in mind.
Latest blog posts
Read all blog posts
9 Professional Hair Scissor Stores to Compare in Australia
Compare Australian buying routes for professional hair scissors, with range differences, delivery-policy links, return conditions and a clearly labelled publisher entry.
10 Scissor Cases, Wallets and Holsters to Compare
Compare ten different scissor storage layouts, from a single-tool case and paired pouch to fold wallets, larger cases and working holsters.