JapanShears Editorial · Published
10 Ways to Make Your Shears Last
Ten ownership decisions that protect a shear over the years, from using it only for hair to choosing a technician and keeping a service record.
On this page
- How this list was chosen
- 1. Use the right shear for the job
- 2. Keep them for hair
- 3. Give each edge a protected home
- 4. Set them down closed, and mind the drop
- 5. Keep them dry
- 6. Follow the model’s own pivot instructions
- 7. Rotate, or keep a backup
- 8. Write it down
- 9. Know your technician before you need one
- 10. Pack it properly when it travels
- What to leave out of the plan
- A one-page version
- Where to go from here
- Questions people ask
- Further reading
How long a shear lasts depends less on one dramatic act of care than on a dozen small decisions about how it is used, stored and serviced. Most of them cost nothing. They are about what you ask the tool to do, where it sits when you are not using it and who you trust with it when something changes.
Short answer. Use the shear only for hair, keep it dry and protected, never force the pivot, record what happens to it and line up a technician who knows its edge before you need one. No material removes the need for these habits, and no habit guarantees a number of years.
How this list was chosen
These are ownership decisions drawn from general trade practice and from the care notes published with shear models. We did not test or time any shear, and we make no claim about how long a particular model lasts. Reviewed 4 November 2026. For the daily routine itself, see shear care habits for every working day.
1. Use the right shear for the job
A cutter asked to do a thinner’s work, or a fine detail shear used on heavy sections, is working outside what it was built for. Match each tool to a job from the start. If a job keeps arriving that your tools do not suit, the answer is a second tool, not more force from the first. The types of shears guide sorts tools by role.
2. Keep them for hair
Cutting paper, card, foil or wire can dull or damage a hair-cutting edge. Keep an inexpensive pair of utility scissors in the station for everything that is not hair, and keep your shears for the job they were bought for.
3. Give each edge a protected home
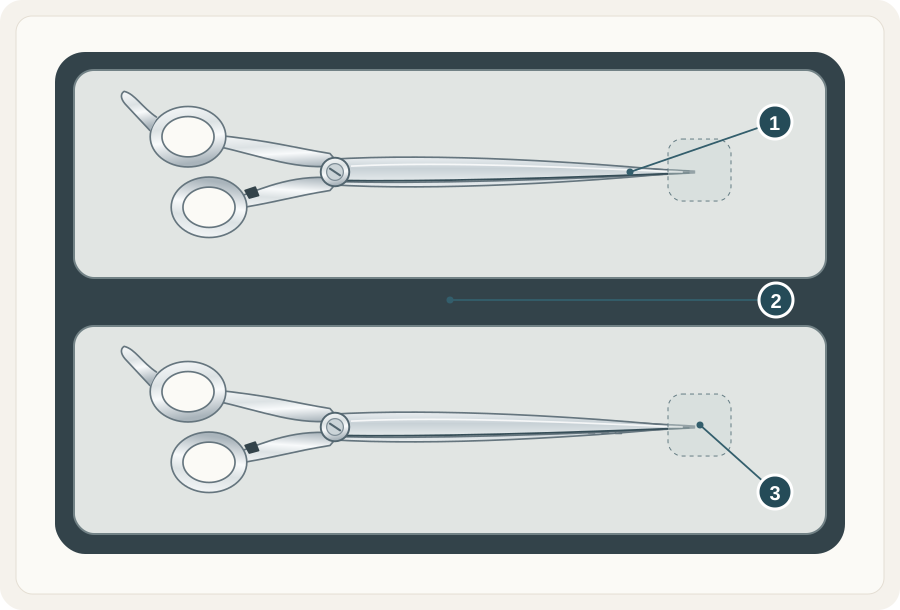
Store shears closed, with the tips covered, in a case, sleeve or holster that keeps them apart from combs, clips and other tools. Loose tools in a drawer or bag are an easy way to chip a tip. The diagram below shows the idea, and the case and holster list compares layouts.
 Open illustration at full size
- Close the toolClose gently before carrying or storing it.
- Separate the toolsKeep cutting edges and tooth blades from meeting another shear or loose accessory.
- Protect the tipsPrevent the tool from sliding or being knocked in storage and transit.
4. Set them down closed, and mind the drop
Place shears on a stable surface rather than the edge of a station, and put them down closed. A fall onto a hard floor can affect an edge or alignment. If one is dropped, stop using it on clients and look at it before you cut again.
5. Keep them dry
Moisture sitting around the pivot or on the blade faces is easy to prevent. Dry the whole shear, including the handles and the area around the pivot, at the end of every session, and do not return it to a damp case. Our care routine sets out the steps.
6. Follow the model’s own pivot instructions
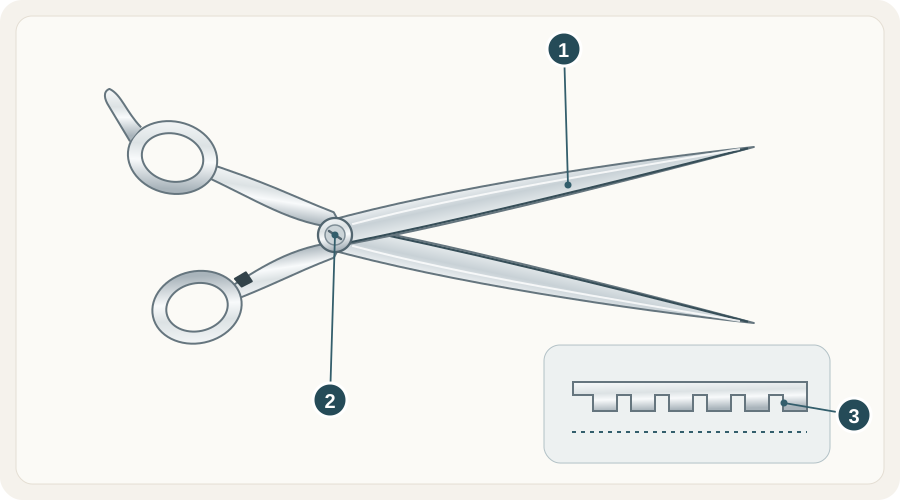
Pivots differ: click-lock, screw, bearing and dry-bearing systems each have their own method. Use the oil, if any, and the adjustment approach given for your model, and avoid tightening the tension in search of a cure. If you are unsure, ask before you adjust; the diagram below names the surfaces to inspect.
 Open illustration at full size
- Blade surfacesLook for loose hair, product residue and moisture without touching the cutting edge.
- PivotCheck the visible joint and how the action feels. Follow the exact model instructions before oiling or adjusting it.
- Thinner teethClear loose hair carefully. Never force a cloth, brush or tool between closed teeth.
7. Rotate, or keep a backup
A single shear in constant use leaves no room for service. If you can, keep a second cutter of a familiar length so that sending one away does not stop your work. A backup that matches your main tool’s nominal size and handle also helps you stay consistent. The questions before adding a second shear apply here.
8. Write it down
A short record of the model, the selected SKU, the purchase date, any drop and each service makes every later conversation easier. A technician can do more with “the tension changed after a fall on this date” than with “it feels off”. The maintenance log guide shows a simple format.
9. Know your technician before you need one
Convex edges, bevelled edges, micro-serration and toothed blades call for a technician who knows the geometry. Find one who services your type before the shear needs attention, and ask what they need from you. Ten questions before sharpening lists them.
10. Pack it properly when it travels
Whether a shear goes to a technician or to a course, protect the tips and edges, keep it in a rigid case and avoid loose parts. The service photo views are worth taking before it goes, and Australia Post lists parcel packaging and tracking options.
What to leave out of the plan
Do not set a fixed calendar for sharpening or adjustment as if one fits every tool. Use symptoms and the model’s guidance. And do not rely on a finish, a coating or a steel name as a substitute for habits: none of them removes the need for care.
A one-page version
Ownership comes down to six lines: use it for hair, keep it dry, keep it protected, follow its instructions, keep a record and know who services it. Pin them near your station, and add the model name and SKU so the record starts on day one.
Where to go from here
The knowledge base collects the care, sharpening and buying guides in one place, and the care guide covers routine cleaning. If a shear already feels different, read ten signs your shears need attention.
Questions people ask
Does a more expensive shear need less care? No. No material or finish removes the need for care, and none guarantees a number of years.
Should I oil the pivot every day? Follow the instructions for your model. There is no universal schedule, and some pivot systems have their own method.
Further reading
- Scissorpedia, an information website on scissors in general.
- Australia Post, for sending a shear safely.
Scissorpedia is a fellow member of the ShearAlliance; see ShearAlliance.
A closer look at shears
Comparing two models? Send us their names or SKUs and the cutting work you have in mind.
Latest blog posts
Read all blog posts
10 Japanese Shear Myths and What Is Actually True
Ten common beliefs about Japanese shears, from blade length to steel and origin, with a plain correction and a way to check each one.

10 Mistakes to Avoid When Buying Shears Online
Ten online-buying mistakes that cost stylists time and money, from trusting the family photo to skipping the returns terms, with a fix for each.