JapanShears Editorial · Published · Updated
20 Hair Scissor Terms Explained in Plain English
Understand twenty common hair-scissor terms, from cutting hand and nominal length to edge types, handle layouts, tooth count and cut ratio.
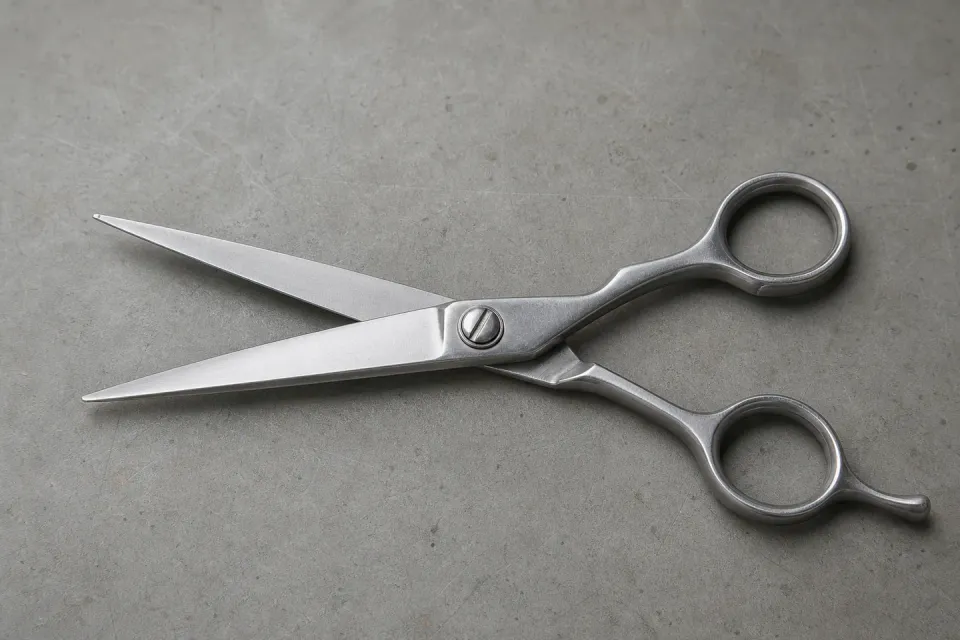
A useful scissor listing tells you what the tool is, which hand it is built for and what changes between options. These twenty terms help you read those details. Hair cutting scissors and professional hair shears are names for the same kind of working tool.
Choose a term below, then use the linked guide when you need a deeper comparison. To put the terms to work, follow the listing walkthrough through selected options, set contents and an unlisted field.
1. Cutting scissors
A cutter has two continuous cutting blades to establish or alter a haircut’s length and shape. Compare its edge, blade line and intended job in the cutter shortlist.
2. Thinning scissors
A toothed shear used to change weight or blend an area while leaving some hair uncut in each action. A common design has one toothed blade and one continuous opposing blade. In a paired set, it has a different job from the cutter.
3. Texturiser
A toothed shear described or sold for a texture effect. The term can overlap with thinner, blender or chunker, so it is not a fixed tooth-count category. Compare the actual spacing and shape with the intended job in the thinning and texturising guide.
4. Cutting hand
The left- or right-handed build of the tool, including how its blades and handles are arranged. A right-handed shear does not become left-handed when you turn it over or move it to the other hand. Symmetric rings alone are not confirmation. Start with the stated hand, then compare the handed constructions.
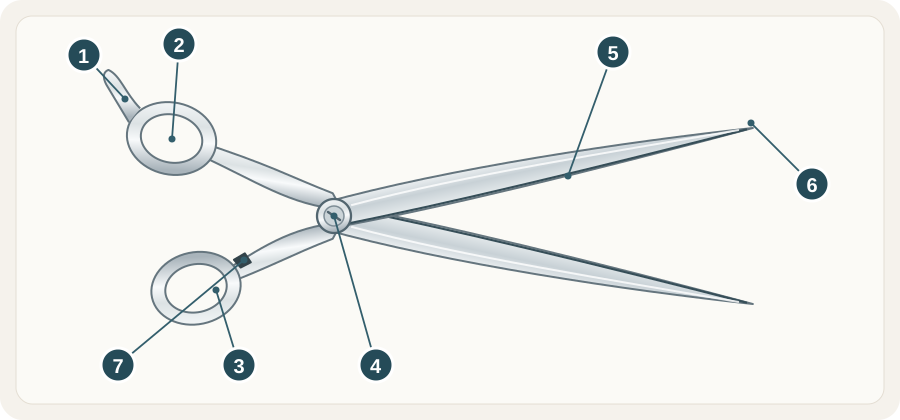 Open illustration at full size
 - Finger restAlso called the tang; the small extension beside the finger ring.
- Finger ringThe bow on the handle opposite the thumb ring.
- Thumb ringConnected to the blade moved by your thumb.
- PivotThe joint where the two halves turn; tension hardware varies.
- Cutting edgeThe sharpened inner border where the blades meet.
- TipsThe ends of the blades. Compare their shape on the actual model.
- BumperA small stop between the handles, sometimes called a silencer.
5. Nominal length
The size name used for the whole shear, usually in inches: for example, 5.5 or 6.0 inches. It is not the exposed cutting-blade measurement. Use a familiar nominal length as a starting comparison, then check the maker’s measurement convention and the size guide.
6. Blade length
The blade’s working span, often published in millimetres. Use the maker’s stated endpoints and exact model code; two cutters with the same nominal length can have different blade spans. The barber-reach guide explains why it matters.
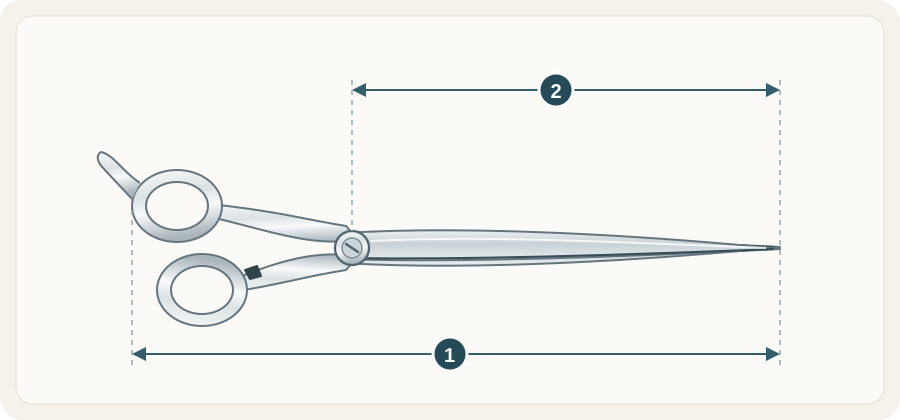 Open illustration at full size
 - Overall tool lengthCompare the maker’s stated whole-tool size. Finger-rest treatment can vary.
- Blade lengthA separate blade measurement. Check the model specification rather than converting its nominal inch label.
7. Convex edge
An edge construction whose outer surface curves towards the cutting edge, rather than presenting one defined flat bevel. The maker may use a more specific term such as semi-convex or a named blade design. Convex does not tell you the blade’s length or curvature along the hair. Use the convex-edge guide to compare complete models.
8. Bevelled edge
An edge with a defined flat face approaching the cutting edge. Makers can use particular versions: Joewell calls its Standard blade flat single bevel and separates it from Convex Shape in its blade specification. Keep the maker’s blade term with the model.
9. Micro-serration
A fine pattern of small serrations along a cutter’s edge. It is an edge detail on a cutting blade, distinct from the larger tooth-and-gap row of a thinner. A selector can change this feature along with size: the Ichiro Ergo’s 5.5-inch cutter is convex and its six-inch cutter is micro-serrated. The blade guide keeps those choices separate.
10. Traditional handle
A handle layout with the thumb and finger rings opposite each other, also described as in-line, level or symmetric. Those words describe ring geometry, not an ambidextrous blade build. Compare the stated cutting hand and complete shape; Joewell’s handle reference separates symmetric and offset layouts.
11. Offset handle
A layout that staggers the rings, placing the thumb ring closer to the blade pivot than the finger ring. Different models have different shanks and ring angles within that description. It is a shape to compare with your grip, rather than a guarantee of comfort. See the offset and crane guide.
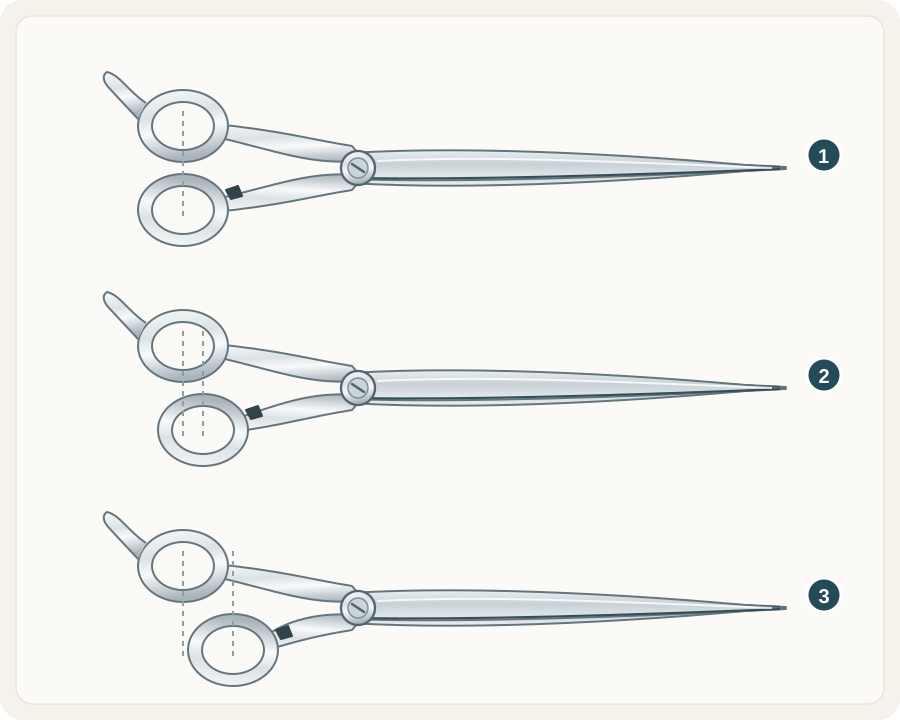 Open illustration at full size
 - Straight / in-lineThe rings sit at a similar distance from the pivot.
- Semi-offsetA small difference between the two handle lengths.
- OffsetThe thumb ring sits closer to the pivot. Compare it with your present tool.
12. Crane handle
A fixed handle shape with a bent or more angled shank arrangement, changing the handle’s relationship with the blade. It goes beyond simply staggering the two rings. The exact outline matters because makers use their own designs; the word crane does not imply that the thumb ring swivels.
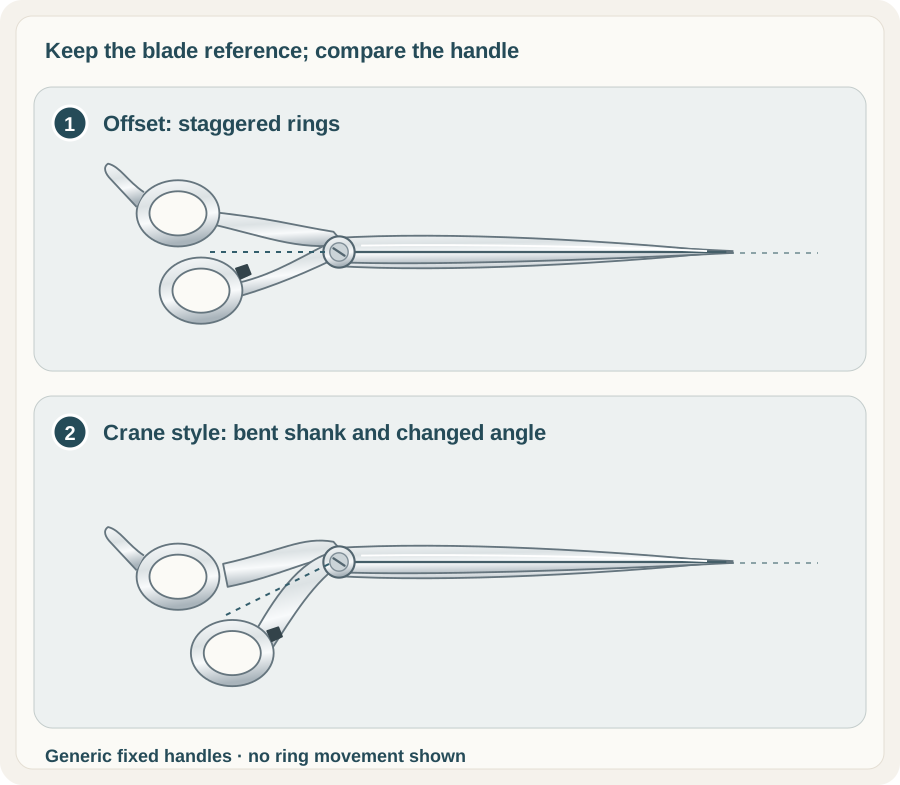 Open illustration at full size
 - Offset arrangementThe thumb ring sits closer to the pivot than the finger ring.
- Crane-style arrangementA bent shank changes the handle angle as well as the ring placement. Compare the exact model’s complete shape.
13. Fixed thumb
A thumb ring that stays fixed to its handle shank rather than moving through an additional thumb joint. Fixed-thumb cutters can still have traditional, offset or crane-style handles. The entire shear also still opens and closes at its main blade pivot; fixed does not mean the blades are immovable.
14. Swivel thumb
A thumb assembly with an additional connection that allows the ring to move independently of blade opening and closing. Ichiro’s handle explanation describes this independent rotation. Check the actual model’s mechanism and care instructions; a decorative pivot screw does not establish a swivel. The fixed-versus-swivel comparison shows that distinction.
15. Blade pivot
The main joint joining the two shear halves so their blades can open and close. It sits between the blades and handles, separate from an articulated thumb connection. Kasho’s parts guide identifies the pivot and its tension systems. Name the correct joint when asking about care or a change in action.
16. Tension adjuster
The screw, dial or model-specific control used to change the setting at the blade pivot. Its appearance does not tell you the correct adjustment method, and a thumb mechanism may need different care. Follow the model’s instructions rather than applying one universal drop-angle test; the care guide explains the questions to ask.
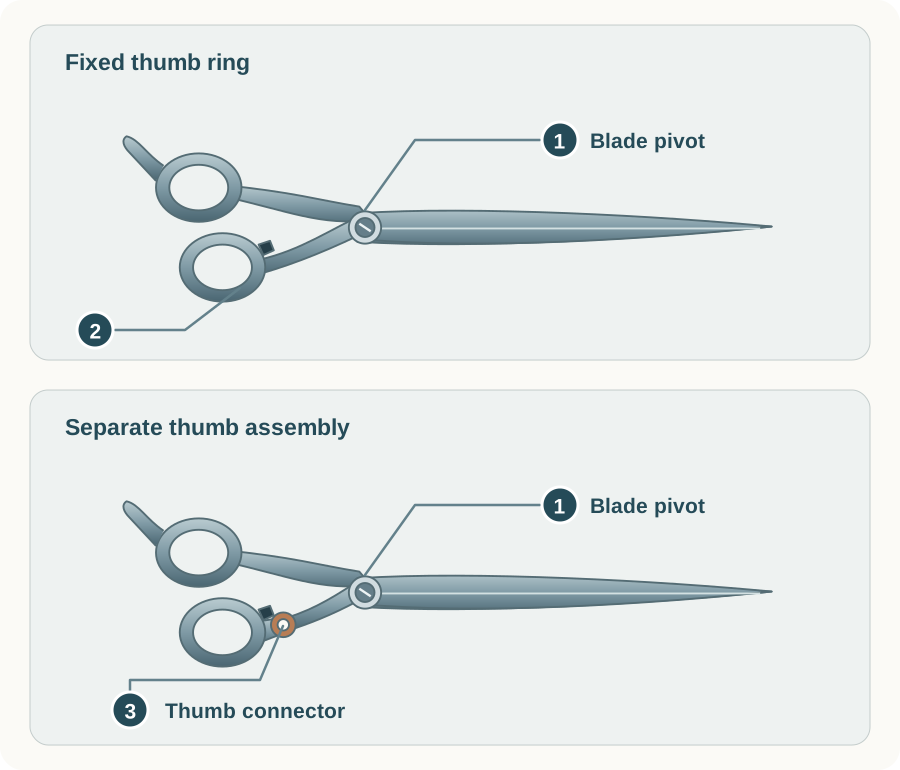 Open illustration at full size
 - Blade pivotThe main joint joins the two shear halves and allows the blades to open and close. It is separate from any thumb articulation.
- Fixed thumb ringThe ring joins a continuous shank in this example. Its position and angle are still handle-shape choices.
- Separate thumb assemblyAn additional connector allows thumb movement apart from opening the blades. The actual mechanism and its care depend on the model.
17. Steel designation
The stated material grade or maker alloy name, such as 440C, ATS314 or Supreme Stainless Alloy. It is one construction field, not a prediction of how long a tool will stay sharp. Finish, layered construction and powder production are separate descriptions. Use the steel library to understand the maker’s complete term.
18. Ring insert
A compatible insert fitted inside a finger or thumb opening to reduce that opening. It does not move the ring, change the cutting hand or shorten the tool. Joewell’s handle reference explains the size adjustment; our fit guide separates ring opening from reach and grip.
19. Tooth count
The number of teeth on the selected toothed blade. Keep it with the exact model or option code, because one family may offer several counts. Tooth width, gaps, tip form and grooves are separate details; the same-count comparison shows how two 30-tooth tools can differ.
20. Cut ratio
A maker’s stated removal figure for a particular thinning model. It is a specification to read with that model’s tooth design, rather than a promise for every hair section or technique. Joewell’s thinning explanation identifies tooth count and shape as factors. Keep quoted percentages attributed through the cut-ratio guide.
Once the listing makes sense, use the buyer’s guide to connect these fields to your own working tool. The online buying checklist then helps you check the selected option and seller terms before ordering.
A closer look at shears
Comparing two models? Send us their names or SKUs and the cutting work you have in mind.
Latest blog posts
Read all blog posts
9 Professional Hair Scissor Stores to Compare in Australia
Compare Australian buying routes for professional hair scissors, with range differences, delivery-policy links, return conditions and a clearly labelled publisher entry.
10 Scissor Cases, Wallets and Holsters to Compare
Compare ten different scissor storage layouts, from a single-tool case and paired pouch to fold wallets, larger cases and working holsters.