How to Compare Hair Shear Fit
Use a familiar shear as your reference for ring opening, thumb position and reach.
By JapanShears EditorialUpdated
On this page
Begin with a tool you know
Put your familiar shear at the centre of the comparison. Note its cutting hand, nominal size, ring positions and the task you use it for. Then describe what you want to change: a smaller ring opening, a different thumb position or more reach. That gives a new handle a specific reason to enter the shortlist.
Make observations with a sound tool you already use, or a training tool or sample you have permission to handle. Apprentices can ask their educator to watch the comparison. An unused delivery with a visible concern belongs in the arrival inspection process before any trial.
Keep these five observations separate
| Observation | What to compare | What to note |
|---|---|---|
| Cutting hand | The selected left- or right-handed build | The hand you actually cut with |
| Ring opening | The space inside each ring | Where the ring shifts, catches or releases in your familiar grip |
| Ring position | Stagger, angle and the shank connecting ring to blade | Which position differs from your reference tool |
| Opening action | How you can move the tool while keeping it placed | Whether your grip changes as it opens and closes |
| Reach | Nominal size and tip position relative to your hand | Whether you can see and place the tips for the task |
The notes belong to the tool and your use of it. A label such as ergonomic gives you less to compare than an actual ring shape or shank angle.
Confirm the hand before adjusting the grip
A dedicated left-handed shear has the appropriate blade arrangement as well as its handle. Equal-looking rings, a finger insert or turning a tool over do not change that build. The handedness explanation shows the construction distinction.
If you cut with the left hand, use the left-handed cutter shortlist before comparing cutter shapes. A separate thinner needs its own handed build; the left-hand thinning example keeps that thinner choice separate.
Ring opening and ring position are different changes
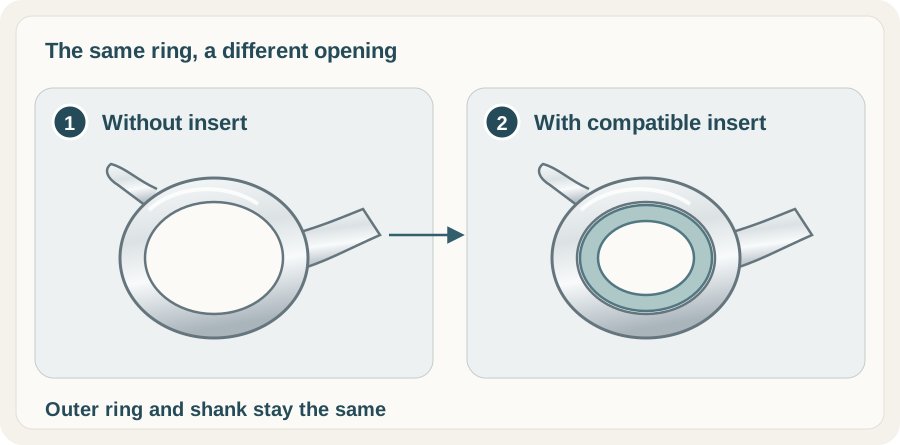
A ring can have an opening that feels loose in your grip while sitting in a position you already like. A compatible insert reduces that opening. Joewell’s finger-hole reference describes separate opening sizes and an insert used to reduce one.
 Open illustration at full size
- Without an insertThe ring opening is the space within the metal bow.
- With a compatible insertThe insert reduces that opening. It does not move the shank or change the blade arrangement.
Use an insert intended for the particular ring and follow its fitting instructions. Record which ring and insert you are comparing. This changes the opening inside the ring; the handle length, blade orientation and nominal shear size remain their own specifications.
If the concern is where the thumb ring sits, compare handle geometry instead. An offset or crane-style layout moves the ring position or changes the angle of its shank. A rotating thumb mechanism adds movement, and its joints depend on the exact model. The fixed versus swivel guide identifies that assembly separately from the central blade pivot. Those are separate construction decisions.
Keep one model comparison focused
At 5.5 inches, the right-handed Kasho Design Master Straight and Design Master Offset offer a useful ring-position comparison. Both belong to the VG-10W, hollow semi-convex Design Master series with a raised ratchet screw. The straight model keeps the rings in line; the offset lowers the thumb ring relative to the finger ring.
You have held the listed nominal size and blade family steady. Weight, contours and the way the complete tools sit still need their own observation. Kasho’s series reference separates the handle variants; their local product pages identify the options available here.
For another fixed-handle comparison, the Juntetsu Classic 5.5-inch cutter uses an opposing, in-line layout. Read it beside the Juntetsu offset range with the selected size visible. A shared steel name does not establish identical reach or grip.
For a movement-specific shortlist, compare the right-handed six-inch Kawa fixed cutter and swivel-thumb cutter. Both list 440C, a convex edge and satin finish. The thumb specification changes; keep the task and your familiar reference tool in the comparison rather than assuming the moving option will suit you.
Observe the movement used for the task
Use the grip and movement you practise in your work; an apprentice’s educator can set that brief. Notice whether the ring shifts, where the thumb sits as the tool opens, and whether you can keep the working tips in view. Write down the moment something changes rather than recording only “comfortable” or “awkward”.
For example, “the thumb ring shifts when I open for this section” gives you a ring or handle feature to discuss. “I want more reach over this comb” points to length. Those observations ask different questions of the next shear.
A closing action that has become rough or a blade that starts catching hair needs a condition check. Use the changed-cut guide rather than tightening the pivot to compensate for a ring-fit concern. Pivot procedures follow the particular model’s instructions.
Set up the kit around those observations
Keep the cutter, thinner and comb easy to identify, with a protected place for each shear. A spare can cover the core task while the main cutter is being serviced. Choose it by that task and a grip you know, then keep the tools’ care records separate.
The budget guide helps prioritise a useful tool. The premium comparison checklist asks what a particular model adds. If you are still developing the movement, use the practice brief to take a specific observation to your educator.
Keep the notes short: current tool, selected candidate, one feature that changes and the task you want it to cover. The kit and workday hub connects the buying, fit and care steps when you need the next one.