JapanShears Editorial · Published
10 Tips for Apprentices Choosing a First Pair of Shears
Ten practical tips for an apprentice buying a first shear, from the course kit list and cutting hand to length, handle, care and when to wait.
On this page
- How this list was chosen
- 1. Start with the kit list
- 2. Confirm your cutting hand
- 3. Buy the tool for the lesson in front of you
- 4. Choose a length you can control
- 5. Compare the handle against one you already know
- 6. Do not chase steel names
- 7. Treat a set as two purchases
- 8. Budget for the case and the care
- 9. Start the care habit on day one
- 10. Keep the record, then plan the second pair
- When to wait
- Where to look next
- Questions people ask
- Further reading
Your first shear does not need to be your last, and it does not need to be impressive. It needs to be the right hand, a length you can control and a tool your educator is happy to see you practise with. Everything else can wait until you know which job the tool is missing.
Short answer. Get the kit requirements from your course first, confirm your cutting hand and buy a single cutter in a length you can place accurately. Add a thinner, a second length or a premium material only when a lesson or a job asks for it.
How this list was chosen
These tips are drawn from general training and trade practice and from the questions apprentices commonly bring to a shear purchase. They are not a course syllabus and they are not based on testing any product. Reviewed 4 November 2026. Your educator’s kit list takes priority over anything here.
1. Start with the kit list
Courses and salons often specify what they want to see: a size range, an edge type or a particular set of tools. Ask for the list in writing before you shop. If it names a requirement, such as a 5.5-inch cutter with a convex edge, treat that as the first filter rather than a suggestion.
2. Confirm your cutting hand
Decide your cutting hand and keep it fixed while you compare. Left-handed shears are built for the left hand; a right-handed shear turned around is not the same tool. Our left versus right-handed guide explains the difference, and the left-handed shortlist names options.
3. Buy the tool for the lesson in front of you
The first weeks usually need a cutter, a comb, clips and a way to protect the tool. A thinner can wait until a lesson asks for one, and a second length can wait until you know why you want it. The first-kit worked example shows this reasoning applied to a real brief.
4. Choose a length you can control
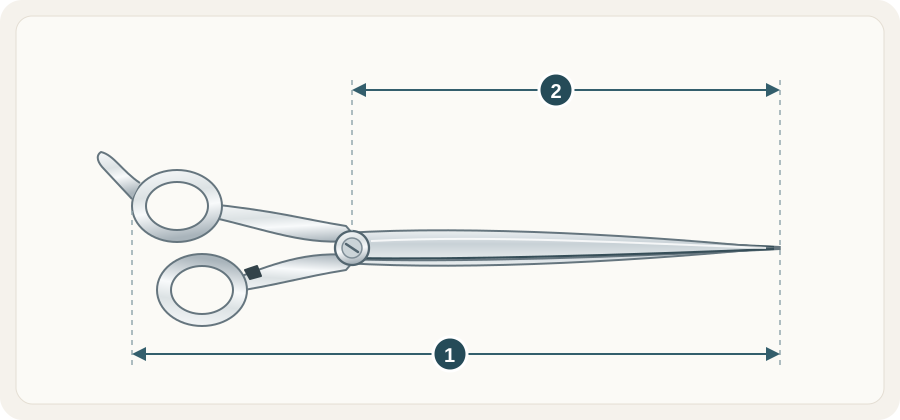
Nominal size is the whole tool, not the blade. A shorter shear keeps the tip near your hand, and a longer one adds reach and asks more of your placement. Pick the length your educator uses or recommends for your first exercises, and use the size guide to understand what the label measures.
 Open illustration at full size
- Overall tool lengthCompare the maker’s stated whole-tool size. Finger-rest treatment can vary.
- Blade lengthA separate blade measurement. Check the model specification rather than converting its nominal inch label.
5. Compare the handle against one you already know
Opposing rings, offset and swivel-thumb layouts change where your thumb and fingers sit. There is no universally correct one. Hold your educator’s shear if they allow it, note what feels familiar and use the fit guide to describe the differences without guessing.
6. Do not chase steel names
A named steel is one line on the spec sheet. For a first pair, whose job is learning control, a clean, correctly aligned and appropriately sized shear matters more than a material headline. When you want to read the steel line, the steel library explains what each name does and does not tell you.
7. Treat a set as two purchases
A cutter and thinner set is two tools, each with its own length and teeth. Buy one when both have a job in your coursework, and read both component records. If the course only needs a cutter, a single shear avoids paying for a second tool you may not use for months.
8. Budget for the case and the care
A shear needs a way to be carried and stored with its edges protected, and a cloth and the right care product for the model. Plan for those when you set a budget, so the tool stays in the condition you bought it. The helpcenter note on first shears covers the basics.
9. Start the care habit on day one
Clear hair, dry the shear and store it covered at the end of every session. It takes under a minute, and it protects the tool you are still learning to use. The care routine guide lists the habits, and a simple maintenance log keeps the record.
10. Keep the record, then plan the second pair
Keep the order confirmation, the selected SKU and any care instructions together. When you can name the job your first shear does not do, such as longer reach, a different edge or a left-handed build, you are ready to think about a second one. Ten questions before adding a second shear and the apprentice upgrade shortlist pick up from there.
When to wait
If your course has not given you a kit list, if you do not yet know your cutting hand with certainty or if your educator supplies tools for the first term, waiting costs you nothing. Practise with what you are given, make notes on what you wish it did differently, and buy when those notes point to a specific feature.
Where to look next
Start with the apprentice shear list for specific cutters to discuss with your educator, the beginner practice checklist to make your first sessions useful and the knowledge base for wider reading. The shear finder filters by hand, length and budget.
Questions people ask
Should an apprentice buy a set? Only if both tools have a job in your coursework. A single cutter covers the first lessons, and a thinner can wait until one is needed.
Is a more expensive first shear worth it? Price does not settle fit. Ask your educator what the course expects, learn your handle and length first and spend more when you can name the job.
Further reading
- Scissorpedia, an information website on scissors in general.
- Safe Work Australia, for work health and safety guidance that applies in training and in salons.
Scissorpedia is a fellow member of the ShearAlliance; see ShearAlliance.
A closer look at shears
Comparing two models? Send us their names or SKUs and the cutting work you have in mind.
Latest blog posts
Read all blog posts
10 Japanese Shear Myths and What Is Actually True
Ten common beliefs about Japanese shears, from blade length to steel and origin, with a plain correction and a way to check each one.

10 Mistakes to Avoid When Buying Shears Online
Ten online-buying mistakes that cost stylists time and money, from trusting the family photo to skipping the returns terms, with a fix for each.